

Description: In this blog post, I’ll provide more in-depth details to the reader regarding configuring TV Channel Style Streaming using videos and live streams with Wowza Streaming Engine. In addition, you’ll learn specific details on how to schedule your programs and insert video ads into your live streams. Finally, the reader will learn how this set-up works with live encoding tools and media players.
Tools Used: Wowza Streaming Engine, Text Wrangler, Wirecast, and Bitmovin Player
An introduction
There is already a great straightforward tutorial on the Wowza website detailing how to configure TV Style Streaming, but this write-up will provide further details and information to assist you with your project. You can refer to the tutorial in the Module Collection section listed with the name, “How to schedule streaming with Wowza Streaming Engine (StreamPublisher)” – Link https://www.wowza.com/docs/how-to-schedule-streaming-with-wowza-streaming-engine-streampublisher. The premise of using TV Channel Style Streaming with Wowza is that it enables content providers who would like to create 24/7 channels using Wowza Streaming Engine.
I’ll be discussing the following items in this blog post:
- Enabling Advanced Level Features
- ServerListenerStreamingPublisher
- ModuleStreamPublisher
- How to Reload Schedules
- How to Edit your SMIL Schedule
- Confirming the Correct Time on Your Server
- Adding Videos
- Adding Videos Ads
- How to Add Live Streams to Your Live Streaming Channel
- Building Your Playlist Items
- Playing your Live Streaming Channel
Enabling Advanced Level Features
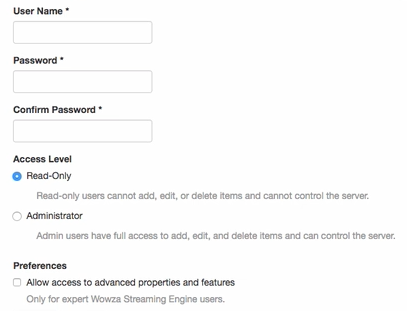
Before you get started working with configuring TV Channel Style Streaming, you’ll need to enable your Wowza Streaming Engine Manager account as an Administrator with access to Advanced level features. This means that “Allow access to advanced properties and features” should be selected from within your Admin account. This will give you the ability to configure items in the Server Listeners and Properties section of Server Setup, and the Properties and Modules section for an Application.
Understanding the ServerListenerStreamingPublisher
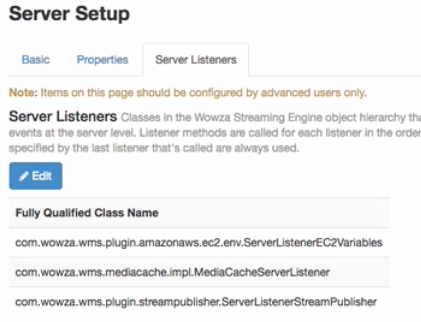
Let’s start with discussing the server listener, ServerListenerStreamingPublisher. It’s listed at the bottom of this image. This item get’s added to the Server Setup and allows live streaming using your SMIL schedule at start-up. The gives you the ability to have videos and live streams played a specific using a schedule. However, the issue with only using this item is it provides no way of loading new schedules. In this scenario, you would have to restart Wowza Streaming Engine every time you’d like to upload and use a new schedule for your channel, and to do this is difficult and unrealistic.
Why ModuleStreamPublisher?
Enter in ModuleStreamPublisher. This module provides the option to reload/refresh your schedule. In terms of the process, this cannot be done through using the Wowza Streaming Engine Manager interface, but must be done by editing your SMIL file by hand and uploading the schedule file to the content location for your application. The is the default content folder unless your make changes for your Application. Once your file is uploaded you can reload the schedule.
How to Reload Schedules
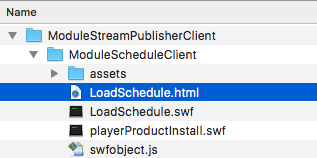
Here’s how it works. To reload/update schedules, you’ll download the Module package, ModuleStreamPublisher, and unzip the files. Keep all files in the same folder and open the LoadSchedule.html page in a web browser. You’ll find the file in the ModuleScheduleClient folder.
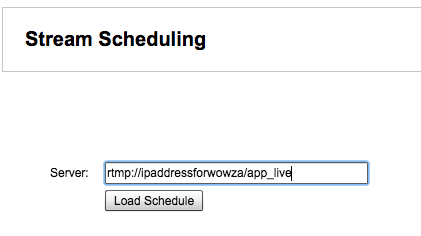
Next, insert the address for your TV Channel Live Stream into the text box similar to what appears above. A stream name is not needed.
Then, click the Load Schedule button. The Message Done! should appear.
How to Edit your SMIL Schedule
To edit your SMIL schedule file you must use a Text Editor to make the changes. Editors such as Notepad++, Text Wrangler, and BBEdit work well for this.
Confirming the Correct Time on Your Server
Before you get started with creating the playlists for you channel, you should first confirm the correct time on your server. You can easily do this by remoting into your server and checking the time that appears in the GUI. Now if you’re using Wowza Streaming Engine with Amazon EC2, keep in mind that this is likely in Coordinated Universal Time (UTC). This will save you a tremendous amount of troubleshooting time by understanding this information from the start. You can also confirm the server time by checking your Wowza logs.
In addition, as you’re testing your playlists, schedule items 10-15 minutes into the future to give yourself time to configure items and update schedules.
Adding Videos
To add videos, it’s best to use .MP4 files using the H.264/AVC codec. These files work well with Wowza Streaming Engine. A good approach to start for testing would be to use a 360p file for playback and encode all videos with the bit rate geared for CBR playback. The required data rate is not too high and you can better understand how the TV Channel Style Streaming set-up works.
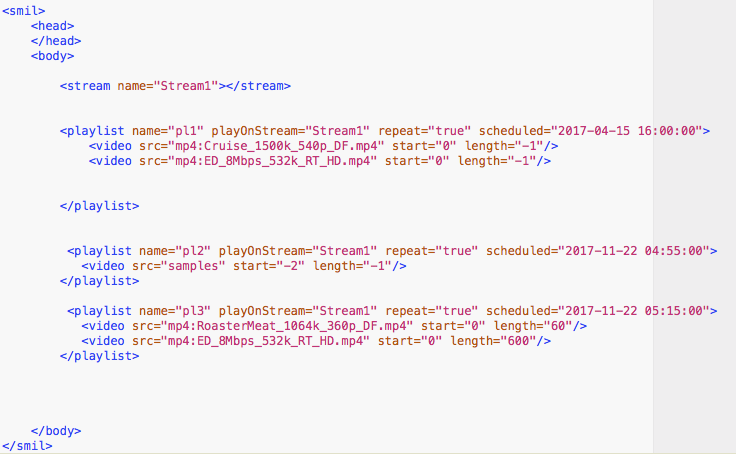
Here’s an example of what the formatting will look like in your SMIL file. You can add a snippet of code like this to your SMIL schedule for a playlist of items with videos that loop. These videos will continue to loop as long as the playlist is playing. If this is the only playlist item, the videos will continue play as long as the server is running. The pl1 parameter listed is the name for the playlist number and is considered a program that is playing on the channel. If you have three playlist items, pl1 would play first, and then pl2 would play next, and pl3 would appear last. Now remember, you are configuring items for a live stream. Therefore, the most important item to understand here is the playOnStream parameter labeled as Stream1. In the live streaming space and in many tools, this is known as the stream name for your TV Channel. Since this is technically a live streaming channel, Stream1 could be changed to whatever you’d like. When you get ready to play the live stream, you would use Stream1. More on that later.
To add videos to your playlist item, you can add the mp4: prefix before each video source as you see above. Using start=“0” will allow the video to start and play from the beginning. You can also have a video start 10 seconds in by using start=“10”. By setting length=”-1″ this will play the entire video to the end and then move to the next source in the list. The way pl1 is designed with two videos means that the videos will continue to loop until the next playlist item occurs. Please note that when the time and date is in the past the playlist will start playing automatically. This usually works well for the first playlist item such a pl1 in this example. If you run into any issues with your videos playing properly, remove the “-1” value for length and use the total time for the video in seconds. This will play the video for the entire duration you specified. Look at the videos in third playlist (pl3) to see how this looks.
Adding Video Ads
If you’d like to include video ads, you can insert the advertisements after the last video in your video playlist, or you can can include a playlist specifically for video ads.
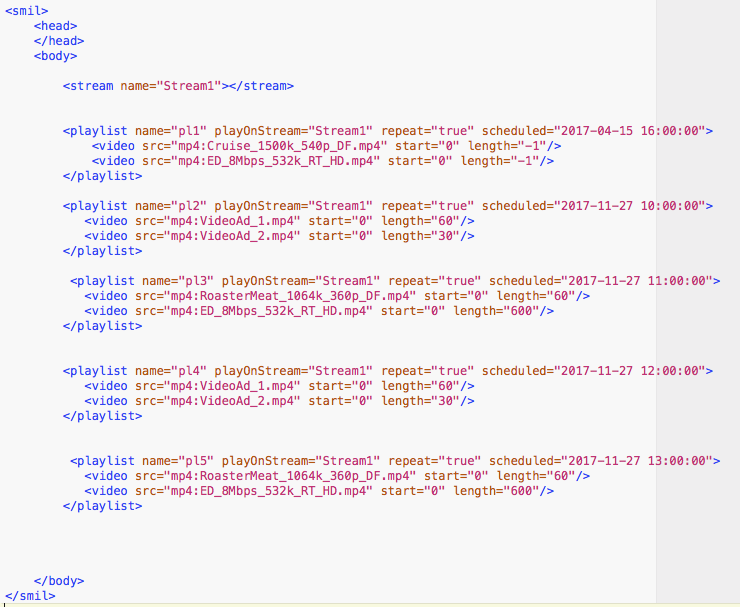
Above is an example of what this would look like. Notice that playlist 2 (pl2) and playlist 4 (pl4) only have video ads that will be inserted into your live streaming TV channel. The benefit of inserting ad-only playlists is you can easily add, remove, and update your ads. In this example there is a 60 second video ad named “VideoAd_1.mp4” and a 30 second ad that follows called “VideoAd_2.mp4. Since the repeat value is set to true, the two video ads will loop until the next playlist at the scheduled time of 10:00:00 UTC.
How to Add Live Streams to Your Live Streaming Channel
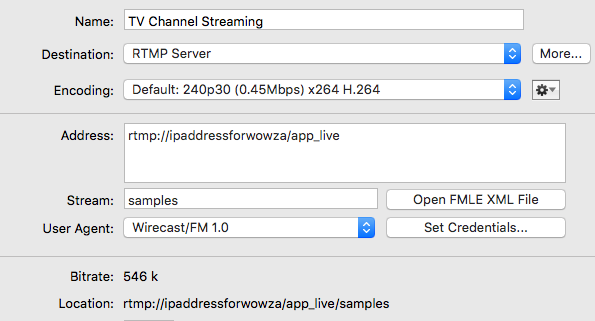
With TV Channel Style Streaming, you actually have a live streaming channel, but you can also insert live streams into your channel. You’ll treat these live streams like you normally would in your live encoder. In terms of the set-up in your live encoder, the following would be configured in a tool such as Wirecast:
Address: rtmp://ipaddressforwowza/app_live
Stream: samples
In this example SMIL schedule, the live streaming channel is working on the Application called app_live. The stream name is samples. In this scenario, you can use any stream name you’d like as long as it’s not “Stream1” because that is the name of the live TV channel, which can be found in the playlist. This is what it looks like on playlist (pl2) of our SMIL schedule. The way our channel is working with playlist (pl2) above, our live stream will go live at 4:55:00 UTC. For live streams start is set to “-2” and length is set to “-1”. In this case, the live stream will continue to play until another playlist item interrupts the playlist at 5:15:00 UTC.
Building Your Playlist Items
When you construct you playlist, you can do it in almost any way that you’d like. This channel has 3 playlists included in the channel’s schedule. The first playlist continues to loop through two videos until it’s interrupted by the live stream for the second playlist at 4:55:00 UTC. The third playlist will start at 5:15:00 UTC and it will continue to loop through the two videos until the server stops or until the schedule is updated/re-loaded. Notice that for the first playlist (pl1) the length is set to “-1”. This means the two videos in the list will play to the end. For the third playlist (pl3), the length is set in seconds which means the first video play for 1 minute and the second video plays for 10 minutes. With the repeat value set to true, the channel will continue to only play this two videos.
With this playlist it has 5 playlist items and the content changes at the top of every hour. It also has ad playlist that occurs at 10:00:00 and 12:00:00 UTC. You can easily configure a 24/7 channel if you continue to use this pattern by adding a new playlist every hour.
Playing your Live Streaming Channel

Now for the final step, playing the channel. To play this live TV channel, you’ll format it like this in your media player. For the player code above, Bitmovin Player is being used. The media player will prioritize MPEG-DASH first and will play HLS second. Notice that the same information is used when sending a live stream to the channel, but in this case “Stream1” is used because it’s the stream name for our live TV channel.
And that’s it for this overview of TV Channel Style Streaming. Hopefully this blog post gives you a better understanding of how live TV Channels work using Wowza Streaming Engine.
Give us a call about signing up to attend one of our 1-Day Wowza Streaming Engine Trainings online. You can also take the training on-site at your location if you desire. Call Freeman Compression LLC at 407.797.5466 for more information or e-mail using the Contact Us form. Also, call for Wowza Streaming Engine consulting if you’re not interested in one of our trainings. Individuals from any country can attend our on-line training classes.